Showing posts with label DIY. Show all posts

Sunday, August 11, 2013

DIY Sensory Tub

I made (put together) this very easy sensory tub. I used an apple crate I bought in Jo-Ann's Fabrics, the green tray is from IKEA and I used a paint stick to hold the tray. You can get crates in ebay or craigslist sometimes even for free. My husband was out of town and I really want it to make it so this is what I came up with. I am pretty sure he would have screw a dowel or a piece of wood instead. But if your husband is not so handy or out out town like mine you can make this very easily yourself.

Materials:
- A crate
- Paint stir stick (free at a hardware store)
- 2 small nails
- A hammer
- Rubbermaid container (optional: I like to use it so I can use the cover and the rice doesn't get full of moths)


Is so simple...Use the hammer to attach the stick to the side of the crate....  

Place the 
green tray inside...


 fill the Rubbermaid container

a and put it in!! That's it! 

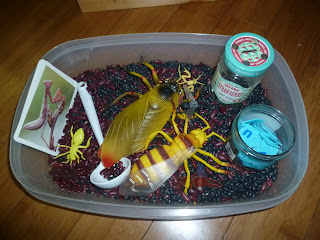
This is an example of one we set up. It is a bug sensory bin. This sensory bin is great
because it is raced from the floor without being too hight the child has to stand...so they can get on their knees if they are little or sitting if they are bigger.

You can even use the inside to store sensory bin items!!!!! 

What else? You can attach pockets to the side to store more things....or even attach a tray to hold spoons and cups and other utensils you are using.

What else? You tell me! What else you can do with it or add to it?

Tuesday, February 5, 2013

DIY Water Wall

This is our water wall. We used a lattice, plastic bottles, funnels, pool noodle and 3 buckets from the dollar store ( they were even made in US!)
My husband attached all those things with a screw driver and screws. And to attache the lattice he used strings and he screw 2 screws to the top of the wall so when we leave this house nobody can see the holes! ;-)

Do you have a water wall at home? Please, leave a link to share with others!

Monday, February 4, 2013

DIY Toddler Jar for Fine Motor Skill

I used a fruit spread jar and made 4 holes big enough to put beans through and maybe small beads and a slot for the plastic letter that I bought in Lakeshore outlet.


   This is an addition to the sensory bin. Our theme is bugs. Even thought this jar is not bug related I always like to add language whenever I can. I make the bin for Little Princes and Umi so there are things that both can do. Like for example, plastic letters for spelling (Umi) and for learning letters (LP), bean pouring, plastic bugs, little jar for putting the bugs, I may add number cards for counting, picture of bugs, etc.

I will post a picture of the sensory bin in my next post! Did you make a bug sensory bin too? Please, link some pictures to share with others!

Friday, November 16, 2012

DIY Balance Beam

Here is an easy activity anybody can do. There isn't any skills required to put this together. I had all the materials at home. The cinder blocks are part of the mud kitchen my husband is making for my children and the wood was just there. I didn't attach it. It seemed to work just fine this way. 


They walked on it...


If you like to attach it then you'll need a drill and make holes on each side of the center divider of the cinder block
where the two squares meet. Then use a rope or wire to tight it.  But it seems to work just fine for us. Make sure you stay close by just for in case they fall or secure the beams to the cinder blocks.


They sat on it...

Umi wrote on it..

Even my husband walked through it...it is strong enough!

Mika, our chihuahua, cracked up!


You can use it to jump over... jump on it!


I hope you like this idea. If you did PLEASE let me know! There are so many views to this blog but no one leaves comment...I am starting to think that I am writing posts just for myself. 

Tuesday, October 30, 2012

Last Minute Halloween Favors/Spooky Critter Snot! (Slime)


Spider Snot! Euuwwww!!!!

We made spooky critter snot to give away instead of candy! I love halloween but I don't love candy. So I found what gave me this idea and recipe at All Things Simple by Kim. We made several batches and it came out great! 

Kim used a 2oz plastic cup made for salsa also called souffle cup. I used a 4oz cup and I bought it at Smart and Final. They were expensive and the caps come separate. I paid 4.19 dollars for the lids and 5.49 for the cups...I bet you can find it cheaper on Amazon or ebay. 


I added a ring that I bought at the dollar store. I would have also
put eye balls if I would have thought about it earlier. But Halloween is tomorrow and
I won't have time to find them. Maybe next year!

So instead of giving candy I will give them spooky critter snot, vampire snot, or skull snot to the trick
or treaters! I also have little box of stickers I bought at the dollar store.


Have a wonderful and fun Halloween!!!!!!!!! 

Monica

Saturday, October 13, 2012

DIY Geoboard

I've been waiting and waiting for my husband to make one of this geoboards for a while. My dear husband is SO busy between work, traveling and all the projects that I bring him. So today I made my OWN geoboard! I got to say that I am very proud of myself for making it...cutting it and all that involved in making it...It was easy. I had the right tools.

So to make your geoboard you need:

- A pegboard that you can get at the hardware store. I had mine left over from another project.
- A jigsaw
- Machine screw nuts and machine screws. See picture below for details.
- Two Clamps
- Sand paper (not fully necessary)


This are the nuts and screws I used. I bought them from Ace Hardware. They cost 15 dollars. I bet if you buy them online they are cheaper. I hope this pictures help you know exactly the kind you need and you can get them online. 


I cut it myself!


Umi helped sanding the edge to clean it a little bit.


I am missing a few pictures that were taken with my fathers phone. I will post them when he sends it to me.

So after I marked the line with a pencil where I want it to cut the pegboard then I clamped the board to the work bench. I used the jigsaw to cut it. I never used the jigsaw before and it wasn't that hard at all. It didn't came as perfectly straight as I wanted to but close enough. So the main part is ready. After that I attached all the screws I had in every other whole. Towards the end I realized that I didn't have enough screws. So I decided to make the small geoboard first to see if they get really into it and if they do I will finish the bigger piece late on. I attached the screws from the back and put the nuts on the front. Umi helped with this part as much as he could. Even Little Princess helped. It was an easy project than even a woman can do!


They liked playing with it! 

Good luck making your geoboard!


Another ideas to make a geoboard: 

1) Use a piece of wood or particle board you may have and use a sheet of graph paper to mark the where the nails are going to be placed. So you can paint the board first or skip it and nail the nails one by one or with a nail gun. 

2) Use a cork board and pins. So you do the same as before mark where you want the pins to go and pin it that way or if your child is little you could use the hot gun to secure them in place.

3) Use a foam board and pins. To use the foam board you may need to glue a few together to make it thick enough got the pin not to stick out. You can find this foam boards at the Dollar Tree store or other 99 C stores. So if you get 2 and cut them in half you will have enough to make it thicker. Once it is cut to the size you want mark where you want the pins and then pin them. You can hot glue them so they won't come out. This option is a good one to take along with you since it is very light and portable.

Make sure to get your children involved in the making of the board. My son is 3 and 1/2 and he helped putting the screws in. He had a hard time screwing the nuts. So I let him help with whatever he could and he had fun learning to make it and math along with it too. I put the screws in every other whole so he had to count and make sure he places the screws in the right whole. 

Well, I can't think about what else to use. Do you have a geoboard you make and you'd like to share it? Please, leave a link in the comment box!

Good luck geoboarding!

Wednesday, October 10, 2012

DIY No Sew Puppet Theater

It has been a long time that I wanted to make a puppet theater for my children. I found ideas on pinterest and on youtube but even the easiest puppet theaters seemed to me a bit complicated...I just wanted to make something simple, practical and that didn't required sewing. I know how to sew a little bit but I just didn't feel like dealing with an old (and much appreciated) sewing machine. So today I got inspired! And it is so simple and so easy you are going to wonder (like I did) why didn't I think about this before!!

Here it is a VERY easy, not too much time consuming puppet theater and how I made it.

Materials:

- Felt
- Shower curtain tension rod
- Pins
- Measuring tape
- Scissors 
- Hot gun


I used green felt because it was what I had available and also because I thought it could be use as grass. Also before making the puppet theater the way I did I had another idea on how I was going to make it. I will live this idea for another post.

Directions:

1) Cut the felt 47" tall and 54" wide. This hight is good for an adult so you can sit on the ground or a child size chair and also for any age because it is adjustable. To cut it it helps if you use the measuring tape and a pin. Measure the hight then pin it and do this every so often from left to right then fold it s the pins are at the edge and the fabric is the size you want. Measure again then cut it. 


2) In this step we are making the top hem of the puppet theater, so this is the top of the theater but seen on the right. Measure six inches and pin it as seen in the above picture. Do this every so often then fold it upwards and so the left edge touches the pins. Then remove those pins and pin it so it attaches to the bottom part and stays in position for next step.

3) Get the glue gun and glue the sides together.

Here you can see the hem done and glued.

And yes!!!! You have a puppet theater!!!! No need for a sewing machine and it took me about 10 to 15 minutes to make it.

It still not fully ready...It needs some decoration or since is felt you can make different felt decorations and stick them in there or pin them with a security pin so you can change the decoration once in a while.

The tension rod cost about 7 dollars and 50 cents and the felt I can't remember since I had it for a while but it may be about 3 dollars a yard....

If you want you can make a top part for it. You just do the same you did to make this theater but you cut it a little bit shorter. I find this unnecessary, you can't see the children's face anyway. 

What I was thinking is to cut a  square on the center and make a window so puppets can play on top and also come out of that little window. Once the theater is done and ready I will post it.

I hope you guys give it a try. It is fun, educational and didn't cost too much to make.

Umi was using it as an entrance to a forest. So maybe I could make some trees and animals to put on it?

Let your imagination run wild!

If you make one please post a link so I can see it! Some times imagination and inspiration are contagious! 


Thursday, March 22, 2012

Rhyming Word Cards in Spanish

Umi is interested in rhyming words. So I was trying to find rhyming words cards in Spanish and I came across a website that lets you print 30 rhyming picture cards in Spanish and also there are other printables work sheets.

This website is called Colorear y aprender (click on the name and the cards will pop up in a new page).


You can print them in card stock and laminate them.


I will add picture of them when I finish making them!


Friday, February 3, 2012

Tornado in a Bottle Science Experiment!

Materials:

- Two empty plastic bottles
- Water
- Tornado Tube (see picture bellow) or duct tape

Directions:

Fill 3/4 of one of the bottles with water
Place the other empty bottle on top and tape it with
the duct tape or use the tornado tube.
See what happens when you flip them over (full water bottle on top)
See what happens if you shake the bottle with water!


I bought this tornado tube in amazon and it is made in USA!!

I will be posting different variations of this experiment soon!

Ooblek!!! It will blow your mind!

Materials:

- Powder corn starch
- Water
- A bowl of some kind

Directions:

Put about a cup of cornstarch in a bow then add about 1/2 cup of water. Add more 
water if is not becoming wet enough or add more starch if is too watery. 


I really want to tell you what happens with this experiment. But I am afraid to take away the 
surprise! Try it first and mess with it. See how liquid it is and what happens when
you touch it harder and faster! It will blow your mind!!! 
Big Boy played with it for long time and we were almost fighting to see who gets to play with it!


For a variation try to make it in a bottle!!! See how the  liquid moves through the bottle when you slowly turn the bottle to its sides. Now, see what happens when you shake it!!! You can add food coloring, some aromatherapy oils and add other things like rice to see if it changes anything...

ENJOY!

DIY Sidewalk Paint

Materials:

- Liquid Corn Starch
- Water
- 1/4 cup
- Brush
- Tempera


Directions:
Put some paint, 1/4 cup of starch and half of the 1/4 cup of water in each compartment.


Mix well.

Enjoy!


Saturday, November 12, 2011

My Version of the Gratitude Tree

This is my version of this Thanks Giving Gratitude Tree.

I used 2 brown construction papers to make the tree and I used her leaves templates which I printed them on construction paper. I laminated the leaves so I can also use them for a leaf matching activity later.

I will use wet erase sharpies to write on the laminated leaves.

Thank you Max and Mum Kids Activities for this great idea!


This is how I'll do this activity.

Everyday I will ask my son what is he thankful for and I will write it on a leaf and we will tape it to the tree. By the time Thanksgiving comes the tree should have plenty of leaves!

Variations:

- You can have your child draw a tree or paint one;
- You can use real brunches to make the tree;
- You can have your child cut the leaves and tree;


If you have any other ideas, please share them by leaving a comment below!


Wednesday, November 9, 2011

Ghost Hanging Activity

The "drying line" is a folding rack I got in the 
Dollar Tree store. 
I made the ghost with felt I had at home. I made a big one
and a smaller one so I could also use it for a felt
story or matching or a size sorting activity.


 Big Boy is a bit over 2 and 1/2 and he did it easily.

Monday, October 31, 2011

DIY Easy Halloween Matching Cards

To make this cards you need:

- Halloween stickers
- Sheet of paper (Use card stock if you don't have laminator)
- Laminator


If you don't feel like cutting the paper use sticky notes and laminate!