Showing posts with label Science. Show all posts

Monday, March 18, 2013

Montessori Flower Arranging Playdough Craft

My son just turned 4 and he got a lot of playdough for his birthday so I was looking at different activities related to playdough and I found a post by Deb Chitwood at Living Montessori Now about montessori inspired spring playdough activities. So that inspired me to come up with this activity that I did today with my kids and they loved it!


Materials:

- Hole punch
- Stickers (any)
- Pipe cleaners
- Some star tags I found at the Dollar store
- Pen 
- Child sized scissors
- Small bucket or basket to collect flowers
- 4oz plastic cup
-Glue


So first the child decorates the cup.

Here Umi glued the star tag to the cup.


Working hard!


With the hole punch you make 2 holes on each of it sides. and use the 
pipe cleaner to make a handle (see below)

Then the child fills the cup with playdough

Then they collect flowers!

They use the scissors to cut the flowers.

Bucket full of flowers.

Done!!!

Little Princess liked the basket like that and didn't
want to add the flowers.

Umi was proud of his work and took like 10 pictures of it!

Once they were done with it we decorated the table with it. Now, when they wake up tomorrow the flowers are going to look a bit different than when they put them in. So we will discus the importance of water, food and sun.

I hope you find this post inspiring as much as I did Deb's!


UPDATE: The flowers didn't wilt as fast as I thought...It seems like the water in the playdough kept them well longer! 

Thursday, January 24, 2013

Water Bead Science


For our science sensory bin this week we placed water beads in water and then we observed the changes. I was amazed by the little, fun and bouncy water balls. We did this once before but we chose one color. This time we did a little of all the colors we have. What was weird is that the clear ones were invisible! It may be obvious now that I think about it, but just like a child we did this activity with no expectations. I knew they were going to expand, but what I didn't know is that the clear ones (that didn't look that clear when they were dry and hard) were going to be invisible!

So, if you decide to play with your children with water beads you could try different experiments. For example, choose red beads and put them in red colored water. Would they be invisible too? What if you put yellow beads in blue water. Would they change the color? What happen if you put them in the freezer? You can talk about what things are invisible in the real world. Like a stick bug on a branch. They camouflage with their surroundings. Or things that are there all the time but we don't see them. For example, when we go to the supermarket we are always looking at the products they have, at the floor, at your child pulling his siblings hair, or the little toddler pulling things off the shelves! haha. We don't normally look at the ceiling, or at the art work if there is any. Then is when we notice that those things were there all the time but we never paid attention to it. Before those things were invisible to us even though they were there all the time. Next time you go to the market ask your children to look at places they never saw before!

Monday, May 28, 2012

Space Sand Experiment

This science experiment it is from out of space! What happens when you mix water and a normal kind of sand? Of course, it gets wet. What happens when you use space sand instead? See it for your self and try it at home. It is a good science activity to do with your child. My suggestion is to do this with regular sand first so he can see that it gets wet then do this experiment next. Later you could color the regular sand the same color of the space sand and repeat this experiment so your child can see the difference from one another.

If your child is older and can write then you could ask him to write what is happening. Maybe he could try to pour oil on the regular sand (dried) and mix it. Then add water to see what happens...Does it get wet still? If it does, does it look like before? Why?

Materials:
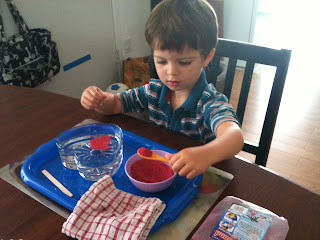
- A rag to clean up any spills 
- A spoon. I also added a craft stick
- A bowl with the space sand 
- A bowl with water

It comes in many colors. I chose red because it is Umi's favorite
color. I bought it on amazon.


Here he is doing some spooning work.  Umi is 3 years old. (5/17/12)

So this is what happens! It automatically dries when it comes in contact with the air!!! 

The best thing of this experiment is that when your child is done you can place the sand on a tray to let the little water droplets dry (they get formed when you spoon the sand out), and you can re use it! Nothing gets wasted!!!


Friday, May 4, 2012

Mirror Exploration Station

Here is our new mirror exploration station. It was VERY easy to make and Umi loved it so did my little  baby girl. It costs 30 including shipping for 6 mirrors in Discount School Supply. Just be careful they seem to scratch easily... They are acrylic I think so they don't brake and are safe for little ones!
I taped the back. Make sure you leave a bit of space between the mirrors so you can
fold them.

        Umi really liked it. He got a piece of tape and taped it close like a triangle and he
said it was a capsule.


05//4/12


Even my Little Princess loved it! 

Friday, April 27, 2012

Magnet Learning Station

This is our magnet learning station. It contains a magnet wand and a 
tackle box with items that are attracted to magnets and other materials that are not. 

Materials that I put in the tackle box:

- Wooden rings
- Cardboard square
- Stainless steal hook
- Key chain ring
- The circles that came with the wand
- Magnet
- Plastic caps
- Stickers
- Glass beads
- Paper clip
- Washer and bolt (can add screws)
- Paper
- Cotton balls
- Piece of sponge
- A penny
- Cloth pin


Then Umi can place the items that are attracted to the magnet wand on one basket and the ones that are not attracted on the other basket.

I am planning on making a magnet exploration bottle. But that is a subject for another post!


Tuesday, April 10, 2012

Outdoor Sensory Tub Activity

Materials:

- Jars and/or tupperware
- Colored cotton balls
- Shaving cream
-Ladle 
- Food coloring
- Turkey baster
- Water

Fill 3/4 of the jars with water and then add shaving cream to the top. Add water to the tub and food coloring on the shaving cream. I got this idea from Teacher Tom and I added my touches. He has a great blog.

Umi liked to squish the baster and also catch cotton balls with the ladle.


This was a fun activity. He learned:

- Color changes when they are mixed
- If you squish the cotton balls water comes out
- How to use the baster
- Pouring water from one jar to another
- Shaving cream makes the water slippery, soapy and foamy

You could add water beads! I will try that tomorrow!


Sunday, April 1, 2012

Celery Experiment

We did a simple and easy experiment. All you need is a jar/glass, water, food coloring and a celery stick. Fill the glass half way with water, add the food coloring you want put the celery in and wait to see what happens!

  The celery absorbs the colored water. The celery that I used was an old one and it took several hours for it to absorb the colored water. I will try this experiment with a new celery next time. What brings it to the next level. Try this experiment using an older celery and a new one. Then you can see which one absorbs the water faster! If you are teaching the time to your child may be you can time it to see how long it took for the celery to absorb the water. Did it take seconds, minutes, or hours? I hope you enjoy this activity. My son had fun with it and I hope yours too!

Wednesday, March 28, 2012

Water Beads Sensory Tub

This is a good way to teach science. It is a very sensorial activity where the children learn transformation, water absorption, color, etc.


This are the beads in the package.

Umi really liked squishing them until they broke.

This beads are wet and dry, bouncy and colorful.  They are used in flower bases and pots instead of dirt or water for decorative purposes. And it is great for the sensory tub and sciences experiment. The beads don't absorb the water immediately it takes time so your child can see the process and how long it takes. 

This is how they look after a few days of the water starting to evaporate.  Once dried you can store them in a sandwich bag and reuse! 


Friday, February 3, 2012

Tornado in a Bottle Science Experiment!

Materials:

- Two empty plastic bottles
- Water
- Tornado Tube (see picture bellow) or duct tape

Directions:

Fill 3/4 of one of the bottles with water
Place the other empty bottle on top and tape it with
the duct tape or use the tornado tube.
See what happens when you flip them over (full water bottle on top)
See what happens if you shake the bottle with water!


I bought this tornado tube in amazon and it is made in USA!!

I will be posting different variations of this experiment soon!

Ooblek!!! It will blow your mind!

Materials:

- Powder corn starch
- Water
- A bowl of some kind

Directions:

Put about a cup of cornstarch in a bow then add about 1/2 cup of water. Add more 
water if is not becoming wet enough or add more starch if is too watery. 


I really want to tell you what happens with this experiment. But I am afraid to take away the 
surprise! Try it first and mess with it. See how liquid it is and what happens when
you touch it harder and faster! It will blow your mind!!! 
Big Boy played with it for long time and we were almost fighting to see who gets to play with it!


For a variation try to make it in a bottle!!! See how the  liquid moves through the bottle when you slowly turn the bottle to its sides. Now, see what happens when you shake it!!! You can add food coloring, some aromatherapy oils and add other things like rice to see if it changes anything...

ENJOY!