Wednesday, December 19, 2012

Design a Town and More Cheap and Easy Christmas Tray Activities

 Design a Town

We bought all of this activities at the Dollar Tree (not the wooden car). 


This is how I set it up. I let Umi play on his own as much as he wants to.  You could make maps that your child can use to design a town. Add cars, people, animals..etc.
Also, you and your child can make up a name for it! You could also make a book about it. Take some pictures and write a story about your town. The picture can go on one page and the child's drawing on the other. If your child is old enough to write he can make the whole book by himself. If not, ask your child to tell you about the picture and you can write it for him.


Umi started making his own thing and having fun.


Matching Activity

I set this up for Little Princess. She is 1 and 1/2 now (Dec. 2012)


The tray and the little erasers came from the Dollar Tree. 
She stills put things in her mouth but not so often like before so she chewed some up...Not good....But if your child doesn't do that you can set this easy tray (Made in USA). 


Thursday, December 13, 2012

Overhead Projector Ideas

Would you like me to tell you a secret? Would you believe me that this cost only 5 bucks and better you could even get it free?? Yes, that's right. I got it for five dollars at the local school warehouse. I got a magnetic white board for 5 bucks too! I even got the unifix cubes of 1000 for 4 dollars!!! The retail price for those are 100 or more. They have computers, tables, chairs, etc. I said you might get some free stuff because sometimes the do get rid of things and they'll give it to you for no cost, or in my case a very low cost. So here is a secret that many people may not know. Call your school and ask the number of the warehouse.


There are many uses for this projector:
1- Light table
2- Tracing table
3- Draw a picture then you can make a mural on the wall
4- Shadow tracing on the wall or a paper on the wall
5- Use it like a chalk board to write on a clear plastic sheet things to be read by the student
6- Add your own ideas...I ran out of mine! 


Cheap Christmas Tray Activities and Games

This games and trays I got it from the Dollar Tree store. 
The left one set all the pegs in the tree (good for hand eye coordination and fine motor skills ) then hop over a peg and take it with you and put it on your plate (peanut butter jar lid). Only one peg has to be left in the Christmas tree.
The right game is a tic tac toe. Choose the pegs you want to use and take them with you. The younger player goes first. You all take turns putting the pegs in the game. The goal is putting 3 pegs in a row to win. You are supposed to stop the other player from wining by putting a peg in the way all the time.

This third tray also came from the Dollar Tree. The child can do patterns, make a bracelet, count, etc.

Little Princes is 1 and 1/2 now. She like playing with the pegs, and put them in the holes
and take them out.


Little Princes loves the beads!


So does Umi!


Other ideas for Christmas trays:

- Wrapping paper left over from wrapping presents for cutting for scissor practice

- Wrapping paper collage

- Draw a Christmas tree and trace cotton balls then let the child decorate the
tree by gluing the cotton balls to the tree.

- Same than above but make it an ornament.

- Draw a candy cane and let the child decorate by gluing cotton balls. Then you can count them see how many it fitted in there.

I hope you all are enjoying this holiday seasons!!!

PS: I apologize for the pictures not being so clear..I took them with my phone since I cannot find my camera....I am hoping Santa will help me with that!! ;-)

Wednesday, December 12, 2012

Easy Christmas Craft Ideas


Paper Plate Ornaments


Materials:

- Paper Plates
- Glue
-Glitter
- Hole Punch
- Fishing Line
- Pin

Give the glue to the child to make his own design. Then he can spread the glitter around.

Tip: Have an extra clean paper plate so when he is done adding the glitter he can shake the excess 
on that plate. Then if you have an extra jar you can put it there so you don't waste any. I don't care if the colors get mixed, neither the children.


After they dry you flip it over and repeat this activity so
both sides are decorated. Then make a hole with the hole punch and tight the fish line to the pin and pin it on the ceiling. You can use yarn if you like instead of fishing line too. 

Umi liked doing this so we made a bunch of them. Little Princess liked it too. She loved shaking the glitter on the paper plates.

Friday, November 16, 2012

DIY Balance Beam

Here is an easy activity anybody can do. There isn't any skills required to put this together. I had all the materials at home. The cinder blocks are part of the mud kitchen my husband is making for my children and the wood was just there. I didn't attach it. It seemed to work just fine this way. 


They walked on it...


If you like to attach it then you'll need a drill and make holes on each side of the center divider of the cinder block
where the two squares meet. Then use a rope or wire to tight it.  But it seems to work just fine for us. Make sure you stay close by just for in case they fall or secure the beams to the cinder blocks.


They sat on it...

Umi wrote on it..

Even my husband walked through it...it is strong enough!

Mika, our chihuahua, cracked up!


You can use it to jump over... jump on it!


I hope you like this idea. If you did PLEASE let me know! There are so many views to this blog but no one leaves comment...I am starting to think that I am writing posts just for myself. 

Monday, November 5, 2012

Dirt Pit Fun!

This is our dirt pit. It is simply a used sand box I bought for 25 dollars and a bag
of top soil.

I added the dollar tree store rings I had and covered them up with the soil without them seeing.
Then I told them that the dirt pit is ready to be used. They played for a while...


Then we added water for extended fun!


The top soil smells a little bit...But it does go away with a shower. Our home was built before 1978 so there is lead in the house and in the dirt. I had it tested. If lead is not a concern in your house you can just get the dirt from your back yard.

My children played with it for long time. The weather here in LA is still great! We went to the beach today and went into the ocean. I just checked the temperature and today it was 91!!!! 


Nov. 5 2012


Friday, November 2, 2012

Gratitude Tree 2012 Version/ El Arbol de la Gratitud Version 2012

So this year I decided to make a different gratitude tree. We used the packing paper that came with something we bought and instead of leaves like our 2011 version of the gratitude tree we traced Umi's hands. Little Princess will get to be part of this activity. She is not talking much yet so Umi will use her hand leaves!
 Umi tells me what he is thankful for and every day now until Thanksgiving we will write it on the leaf.

Did you make a gratitude tree that you'd like to share?


Happy Thanksgiving!!!

Monica
Nov. 2nd 2012

Tuesday, October 30, 2012

Last Minute Halloween Favors/Spooky Critter Snot! (Slime)


Spider Snot! Euuwwww!!!!

We made spooky critter snot to give away instead of candy! I love halloween but I don't love candy. So I found what gave me this idea and recipe at All Things Simple by Kim. We made several batches and it came out great! 

Kim used a 2oz plastic cup made for salsa also called souffle cup. I used a 4oz cup and I bought it at Smart and Final. They were expensive and the caps come separate. I paid 4.19 dollars for the lids and 5.49 for the cups...I bet you can find it cheaper on Amazon or ebay. 


I added a ring that I bought at the dollar store. I would have also
put eye balls if I would have thought about it earlier. But Halloween is tomorrow and
I won't have time to find them. Maybe next year!

So instead of giving candy I will give them spooky critter snot, vampire snot, or skull snot to the trick
or treaters! I also have little box of stickers I bought at the dollar store.


Have a wonderful and fun Halloween!!!!!!!!! 

Monica

Saturday, October 13, 2012

DIY Geoboard

I've been waiting and waiting for my husband to make one of this geoboards for a while. My dear husband is SO busy between work, traveling and all the projects that I bring him. So today I made my OWN geoboard! I got to say that I am very proud of myself for making it...cutting it and all that involved in making it...It was easy. I had the right tools.

So to make your geoboard you need:

- A pegboard that you can get at the hardware store. I had mine left over from another project.
- A jigsaw
- Machine screw nuts and machine screws. See picture below for details.
- Two Clamps
- Sand paper (not fully necessary)


This are the nuts and screws I used. I bought them from Ace Hardware. They cost 15 dollars. I bet if you buy them online they are cheaper. I hope this pictures help you know exactly the kind you need and you can get them online. 


I cut it myself!


Umi helped sanding the edge to clean it a little bit.


I am missing a few pictures that were taken with my fathers phone. I will post them when he sends it to me.

So after I marked the line with a pencil where I want it to cut the pegboard then I clamped the board to the work bench. I used the jigsaw to cut it. I never used the jigsaw before and it wasn't that hard at all. It didn't came as perfectly straight as I wanted to but close enough. So the main part is ready. After that I attached all the screws I had in every other whole. Towards the end I realized that I didn't have enough screws. So I decided to make the small geoboard first to see if they get really into it and if they do I will finish the bigger piece late on. I attached the screws from the back and put the nuts on the front. Umi helped with this part as much as he could. Even Little Princess helped. It was an easy project than even a woman can do!


They liked playing with it! 

Good luck making your geoboard!


Another ideas to make a geoboard: 

1) Use a piece of wood or particle board you may have and use a sheet of graph paper to mark the where the nails are going to be placed. So you can paint the board first or skip it and nail the nails one by one or with a nail gun. 

2) Use a cork board and pins. So you do the same as before mark where you want the pins to go and pin it that way or if your child is little you could use the hot gun to secure them in place.

3) Use a foam board and pins. To use the foam board you may need to glue a few together to make it thick enough got the pin not to stick out. You can find this foam boards at the Dollar Tree store or other 99 C stores. So if you get 2 and cut them in half you will have enough to make it thicker. Once it is cut to the size you want mark where you want the pins and then pin them. You can hot glue them so they won't come out. This option is a good one to take along with you since it is very light and portable.

Make sure to get your children involved in the making of the board. My son is 3 and 1/2 and he helped putting the screws in. He had a hard time screwing the nuts. So I let him help with whatever he could and he had fun learning to make it and math along with it too. I put the screws in every other whole so he had to count and make sure he places the screws in the right whole. 

Well, I can't think about what else to use. Do you have a geoboard you make and you'd like to share it? Please, leave a link in the comment box!

Good luck geoboarding!

Wednesday, October 10, 2012

DIY No Sew Puppet Theater

It has been a long time that I wanted to make a puppet theater for my children. I found ideas on pinterest and on youtube but even the easiest puppet theaters seemed to me a bit complicated...I just wanted to make something simple, practical and that didn't required sewing. I know how to sew a little bit but I just didn't feel like dealing with an old (and much appreciated) sewing machine. So today I got inspired! And it is so simple and so easy you are going to wonder (like I did) why didn't I think about this before!!

Here it is a VERY easy, not too much time consuming puppet theater and how I made it.

Materials:

- Felt
- Shower curtain tension rod
- Pins
- Measuring tape
- Scissors 
- Hot gun


I used green felt because it was what I had available and also because I thought it could be use as grass. Also before making the puppet theater the way I did I had another idea on how I was going to make it. I will live this idea for another post.

Directions:

1) Cut the felt 47" tall and 54" wide. This hight is good for an adult so you can sit on the ground or a child size chair and also for any age because it is adjustable. To cut it it helps if you use the measuring tape and a pin. Measure the hight then pin it and do this every so often from left to right then fold it s the pins are at the edge and the fabric is the size you want. Measure again then cut it. 


2) In this step we are making the top hem of the puppet theater, so this is the top of the theater but seen on the right. Measure six inches and pin it as seen in the above picture. Do this every so often then fold it upwards and so the left edge touches the pins. Then remove those pins and pin it so it attaches to the bottom part and stays in position for next step.

3) Get the glue gun and glue the sides together.

Here you can see the hem done and glued.

And yes!!!! You have a puppet theater!!!! No need for a sewing machine and it took me about 10 to 15 minutes to make it.

It still not fully ready...It needs some decoration or since is felt you can make different felt decorations and stick them in there or pin them with a security pin so you can change the decoration once in a while.

The tension rod cost about 7 dollars and 50 cents and the felt I can't remember since I had it for a while but it may be about 3 dollars a yard....

If you want you can make a top part for it. You just do the same you did to make this theater but you cut it a little bit shorter. I find this unnecessary, you can't see the children's face anyway. 

What I was thinking is to cut a  square on the center and make a window so puppets can play on top and also come out of that little window. Once the theater is done and ready I will post it.

I hope you guys give it a try. It is fun, educational and didn't cost too much to make.

Umi was using it as an entrance to a forest. So maybe I could make some trees and animals to put on it?

Let your imagination run wild!

If you make one please post a link so I can see it! Some times imagination and inspiration are contagious! 


Monday, October 8, 2012

I am stopping by to say hello!

Hello everyone! I just wanted to say hi and let you know that I am not gone. We've been very busy during the summer and we are still are busy...I have so many projects and ideas that some times it is hard to take the time to post them or other things we are working on.

We had to swap rooms. So our learning room has moved to the our bedroom! At this point everything is a bit messy. The good thing is that our bed room was just a little bigger so we could add a bookshelf that we had in our bedroom which it will be used for my Little Princess's tot school trays. I will post before and after pictures when it is ready. It will take a little while since we have to wait for my husband to finish moving the craft closet that we have still in the bed room.

What I am excited about is that once that closet is gone my husband is going to make small shelves for books for Umi in our bedroom! He LOVES reading. When he is quiet and don't know where he is...there he would be in our room reading a book.

Do you have a school room? or you use any room in the house? I'd love to visit your space! Leave a link and share with me and other if you like!

Monday, August 27, 2012

Curriculum Choices and Our Ideas for this Year

You may wonder what curriculum we are currently using or if we use one at all. There are so many choices and so many blogs and so many websites to choose from that it could be a little bit overwhelming to know what to do. So I came out with our plan for this year. I mainly let him lead but sometimes I add things to the mix that I know he may like. So our plan is not strict and it may eve change and take its own course.

 Umi is almost 3 and 1/2 and he is currently in Pre-K. This year  (2012-2013) we will use:

- Math: Math -U-See (Primer) and Montessori

- Science: Mudpies and Magnets and other ideas from other blogs

- Arts and Crafts: Ideas from other blogs and pinterest

- The rest of the subjects I use Montessori.

- Unit Studies and Lapbooks for anything that  he is interested in learning about. So he chooses what he wants to learn about. We make a lapbook and we decorate the cork board.

Currently he is interested in the solar system. So we are working on a lapbook and we have a cork board that we are going to display the solar system that we are making. I will hopefully write a post about this activity it is fun and he is enjoying it.

One thing it helps to choose curriculum or a path in homeschooling your child is to write your goals and desires in a sheet of paper.  Then once you read  them out loud and crossed out the ones you realized are not so important you can find the way to achieve them. And remember it is not the quantity that matters but the quality. Therefore I think it is better to accomplish 2 goals and done well than cram your child's year with TONS of activities that gets him stressed and force him to live up to your expectations.   So remember to follow your child! You can plan all you want but if your child is not enjoying your choices of activities then you need to reevaluate what you guys are doing and come up with something your child enjoys. The goal of homeschooling is not to do what schools do. It is not to follow a strict curriculum made for a large group but rather to follow your child so he can keep the love of learning and learn at his or her pace. It is just like music you need to find the beat and follow it!


Wednesday, August 1, 2012

The BEST parenting book you could ever buy!!

I am not much of a reader...I like books but sometimes I get bored or they don't catch my attention. There is one book that I believe it will turn your life and your family's life around. This book will enhance your life and give you the tools you need to heal yourself and to raise a happy and peaceful child. The author of this book is Naomi Aldort. You can find some of her  videos here. So if you don't know it by now you may be wondering what is the book's title.  Raising Our Children Raising Ourselves is about "transforming parent-child's relationships from reaction and struggle to freedom, power and joy" as it is written on the cover page.


While reading this book you may want to have pencil ready to highlight all the important things that are written in this book and believe me there are TONS of things that may leave you thinking and you may want to revisit the pages again later to get a refresh on the subject.

I don't want to spoil the book by giving too much information but there is one thing I can say if there is anything you should do for you and your child is to read this book. I am not religious but to me is like the bible of parenting. When you read this book you may discover things we innocently do wrong and we don't even know it. Like, telling your crying child "it is ok, don't cry, you are not a baby."

I love this book and I will be reading it over and over again for as long I am a mother. I hope you find it as helpful as I do.

Saturday, July 21, 2012

The Beginning of our Continent Boxes

I've been busy and carried away with life and things to do but here are some of the things we've been working on. I finally bought the boxes from ikea they came 2 and were only 5 dollars (see them here).
I printed a lot of things to add to the boxes here are a few links.

Paper Doll Friends from Around the World: I will post a picture when I finish them. You print the body of the doll on card stock then you can laminated them. Also you can print clothing and hairs etc, and you can also laminate them and use velcro dots (cut in halves), magnets, double side tape, or what ever it crosses your imagination. One is done your child can dress them and play. I think Umi will have lots of fun with this.

Paper Cut Out Models This are cut out models of many things like the White House for example. Depending on your child's age they can do it alone or if they are little like Umi (3 y/o) you can help them and they are a perfect addition to the continent boxes.

There is a great blog with many ideas for the continent boxes. It is called The Little List. It is a GREAT blog. She hasn't been blogging since a year ago..But her blog is really good!

So I stopped by to say hello to all of you! I hope soon we can get started with our first continent box, the North America box.

Ah! I almost forgot to tell you about other free resources! You can do a search on free travel guides and then choose from the one you like the most and they send you magazines and brochures with pictures of all the states you choose! I got a LOT of them! You can also use them for a pretend travel agency at home play!

Monday, May 28, 2012

Space Sand Experiment

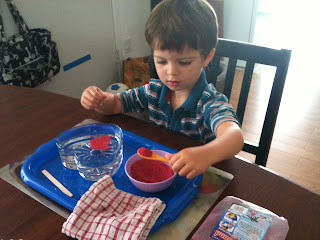
This science experiment it is from out of space! What happens when you mix water and a normal kind of sand? Of course, it gets wet. What happens when you use space sand instead? See it for your self and try it at home. It is a good science activity to do with your child. My suggestion is to do this with regular sand first so he can see that it gets wet then do this experiment next. Later you could color the regular sand the same color of the space sand and repeat this experiment so your child can see the difference from one another.

If your child is older and can write then you could ask him to write what is happening. Maybe he could try to pour oil on the regular sand (dried) and mix it. Then add water to see what happens...Does it get wet still? If it does, does it look like before? Why?

Materials:
- A rag to clean up any spills 
- A spoon. I also added a craft stick
- A bowl with the space sand 
- A bowl with water

It comes in many colors. I chose red because it is Umi's favorite
color. I bought it on amazon.


Here he is doing some spooning work.  Umi is 3 years old. (5/17/12)

So this is what happens! It automatically dries when it comes in contact with the air!!! 

The best thing of this experiment is that when your child is done you can place the sand on a tray to let the little water droplets dry (they get formed when you spoon the sand out), and you can re use it! Nothing gets wasted!!!