Hello everyone,
There is a lot going on in my life now and I've been so busy that I haven't had the time to blog or even to set up our Christmas tree yet! It is a good thing in a way because all that is happening it is positive and very exiting. The last day of September 2013 we decided we wanted to have another child and by October 21st I found out I am PREGNANT!!! So I got pregnant in matter of days...it happened so fast that still I can't believe there is a human being growing inside of me. What a miracle...
Another change in our lives is that we bought a house!!! Yes, no more renting for us!! We are still in the process of fixing it up. We stripped all the carpet out and my husband is refinishing the hardwood floors what ended up being a pain. After my husband had it all sanded we let the painters help and they put the wrong stain, they tried in vain to remove it with paint stripper (the stain came out a bit but left a bloody mess) and washed their hands off of it with an excuse that he went to the hospital...So my husband had to clean it up and sand it again...A week later he is now ready to give it the first coat of varnish and hopefully next week we can move! I am currently renting a 650 square feet house. It is a 2 bedroom one bath. In contrast, then house we bought is a 3 bedroom, one bath and the best thing about the house is that it has a guest house in the back that it will become out school house!! It needs to be painted and needs a new floor. With some time I will have it ready to go. I will post about it when it is ready.
I am so excited about all of this that I can't sleep at night thinking and thinking of all the good things that happened to us in the past few months...
Even though I am happy about it I will miss my city and all the fun things we have done here...like walks to the coast, and the walks to see the wild peacocks, my nice neighbors, etc.. We've been living here for over 6 years and it is a bit sad to leave but it is a positive change and it had to be done...We are going to be so much more comfortable and we won't be throwing our money away anymore.
I am hoping this weekend we can get our Christmas tree and make some vegan pumpkin cookies. My husband's speciality is his yummy ginger bread cookies that my kids love. Umi and my Little Princess wrote letters to Santa. He wrote it with his own hands..I can't believe he can do that. And she so cute pretended to write...I will post their letters to Santa when they are done...hopefully in a few hours we can finish them!
I am originally from Argentina and we celebrate Christmas on the 24th with my family that also live here in the US. My husband is American and we celebrate Christmas day with his family.
What do you usually do for Christmas? Do you have a fun tradition to share?
I wish you all a very merry Christmas and a super happy New Year!!!
Feliz Navidad!!!! Y prospero Ano Nuevo!!!!
Monica
Friday, December 20, 2013
Sunday, October 6, 2013
Our Fall/Halloween Sensory Tub
I was trying to make a sensory tub with corn but I couldn't find any for some reason. So I bought bird food and that is what I used! They are sun flower seeds. I bought them at the 99 cent store. I used two bags. I also added spiders, and other plastic rings, an eye scoop, etc. My kids really like to play with it. I also added "invisible" numbers.


Share a link of your sensory tub!!
Tuesday, August 27, 2013
North America Continent Box - Montessori
Finally!!!! I finished the first continent box! We live in North America so it is the first of all.

I bought the box in Ikea. It was inexpensive and it came four I believe (?)

This is what we have inside. Lets take a closer look.

Inside the small box I have souvenirs that I got when I travelled and
things my family gave me when they travelled. To the left I have the Empire State building, a New York frame, the Statue of Liberty, two magnets of the Twin Towers, a Jade pendant from Canada, a Mexican game, sand jar from Puerto Vallarta, Mexico, Alcatraz souvenir and San Francisco souvenir address books and a California driver license and behind it the US flag.

This are brochures that I got from free from the internet. You can google free online brochures and they'll send it to you for free.

This a book I had with the pledge of allegiance.

This is the first thing my son wanted to read. We read it all in one sitting!
You can even do a unit study with this book!

Another book I had. It has beautiful pictures.

This is how I organized all the 3-part cards and other cards I have. They are 6 x 9 manila envelopes.
It works great to keep it all contained and when it is time to use them I will display it in a tray.
I got this Flags of North America from Montessori Print Shop

This and the one below are little dressing laminated dolls I printed from Making Friends


This are postcards that I had and ones that I collected from my yahoo group Postcards Around the Planet

Sports Originating in North America from Hands on Homeschooler. In the cards it says Montessori Tidbits. Leann must have change the name of the blog?

This are homes of North America that I took from the homes of the world I printed from Montessori Print Shop

I got this cards from The Helpful Garden (scroll down)

This are flashcards that I bought in Target. I got two sets so it is a matching game too.

This is Mexico envelope from Little Passports

I display all the souvenirs on his shelf. I bought that book of North America in Amazon.

This is how it looks!!!
So today we looked at the souvenirs and read the "When grandma and grandpa visited Canada" book. Next time I will put on display the next activity it could be anything that I show you. Umi will choose what he wants to learn. And then I will put it on a tray for him.
I had fun getting this ready! I hope you find this post helpful and please feel free to post a link on how you set your North America box!!
Monday, August 12, 2013
Cocoa Chia Peanut Butter Oat Raw Cookies Recipe!!! Delicious!!!!
While looking for a raw and healthy recipe I came across this recipe and I made a few changes to make it a bit healthier even and I have to say that I LOVE IT!!!! They came out super delicious!!
So, for this recipe you'll need:
- 1/4 cup of organic coconut syrup
- 1/2 cup of organic oat milk (you can use any other nut milk. Do not use cow's milk! This is a raw recipe and cow's milk may get sour and yucky...and between you and me cow's milk is for calves not humans.)
- 1/2 cup of coconut butter (Place 2 and 1/2 cups of organic unsweetened shredded coconut in the vitamix (or any other blender or a food processor) and turn it on...you will have to stop it and use a spoon to put the butter down and then turn on again. To make the mixing work faster I add coconut oil (coconut oil or any oil is not really healthy....I think that adding a bit of water may do the job. I'll try that next time) It is not liquid when it is done. It has the texture of the coconut oil when is in the hard state.
- 1/2 cup of organic peanut butter
- 1 Tbl of vanilla extract
- 2 Tbs of organic cocoa powder
- 2 cups of rolled oats
- 4 Tbs of chia seeds (optional)
Directions:
Place all the wet ingredients and mix well. Then add the rest of the ingredients and mix well.
You can enjoy them in these 3 ways:
1) Make them into small balls or flat cookies and eat them just like that!!!
2) Place the cookies and place them in a plate in the fridge and leave it there for about an hour before consumption.
3) Place them in the dehydrator. "Hearts in your food" recommends put it in 140 for about an hour...I like to use less temperature so I have them at 105 and I will leave it for about an hour and a half and check how they look...You really do not have to worry or stress this cookies can be eaten even without putting them in the dehydrator so you can look if they look ready to you then they are!
Store them in the fridge!!
When you eat them they'll melt in your mouth!!!! They are delicious!!! I hope you enjoy them as much as me and my children do!!!
Please let me know how you like it!!
Homeschool/Playroom Tour 2013
This is our homeschool room and playroom. I've been working hard to organize it and finally today I can say it is nice and ready! Although I know it won't last long I want it to share it with you before my kids "attack" it tomorrow!

It is a small room and it is not easy to store all the materials we have and display
all the materials I'd like but I am happy I have this space to dedicate to my children's learning journey.

My husband made the red shelving unit and we use it to hold the following subjects: math, language, zoology, sensorial and geography. Umi uses it the most.

To the left is Umi's desk I got from a thrift store for only 15 bucks!

This is to the right of the door. This shelf is mainly for my Little Princess. My husband made the blue picket fence shelf that is above the brown shelf and it holds all the paints and some of the art related things. The other art supplies, paper and more things I store them in the red art cabinet you can see to the left.

This is an Ikea trofast unit and I use it to store the circle time activities, flannel stories, puppets, building toys and other toys.

Here is where I store the music instruments.

This is a close up of the art shelf

This is what we currently have in Little Princess shelves.


This is the magnetic black board my husband made for us!!

Right above the black board is going to be a dry erase whiteboard my husband is currently making.

The North America box is ready!!! Is the Ikea box with the polka-dots. To the right is the sensory bin I made.

Video tour of our homeschool room.
Thank you for stopping by!!! See you soon!
Sunday, August 11, 2013
DIY Sensory Tub
I made (put together) this very easy sensory tub. I used an apple crate I bought in Jo-Ann's Fabrics, the green tray is from IKEA and I used a paint stick to hold the tray. You can get crates in ebay or craigslist sometimes even for free. My husband was out of town and I really want it to make it so this is what I came up with. I am pretty sure he would have screw a dowel or a piece of wood instead. But if your husband is not so handy or out out town like mine you can make this very easily yourself.


Materials:
- A crate
- Paint stir stick (free at a hardware store)
- 2 small nails
- A hammer
- Rubbermaid container (optional: I like to use it so I can use the cover and the rice doesn't get full of moths)

Is so simple...Use the hammer to attach the stick to the side of the crate....

Place the
green tray inside...
fill the Rubbermaid container

a and put it in!! That's it!

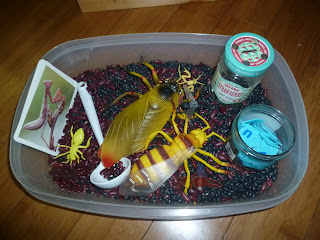
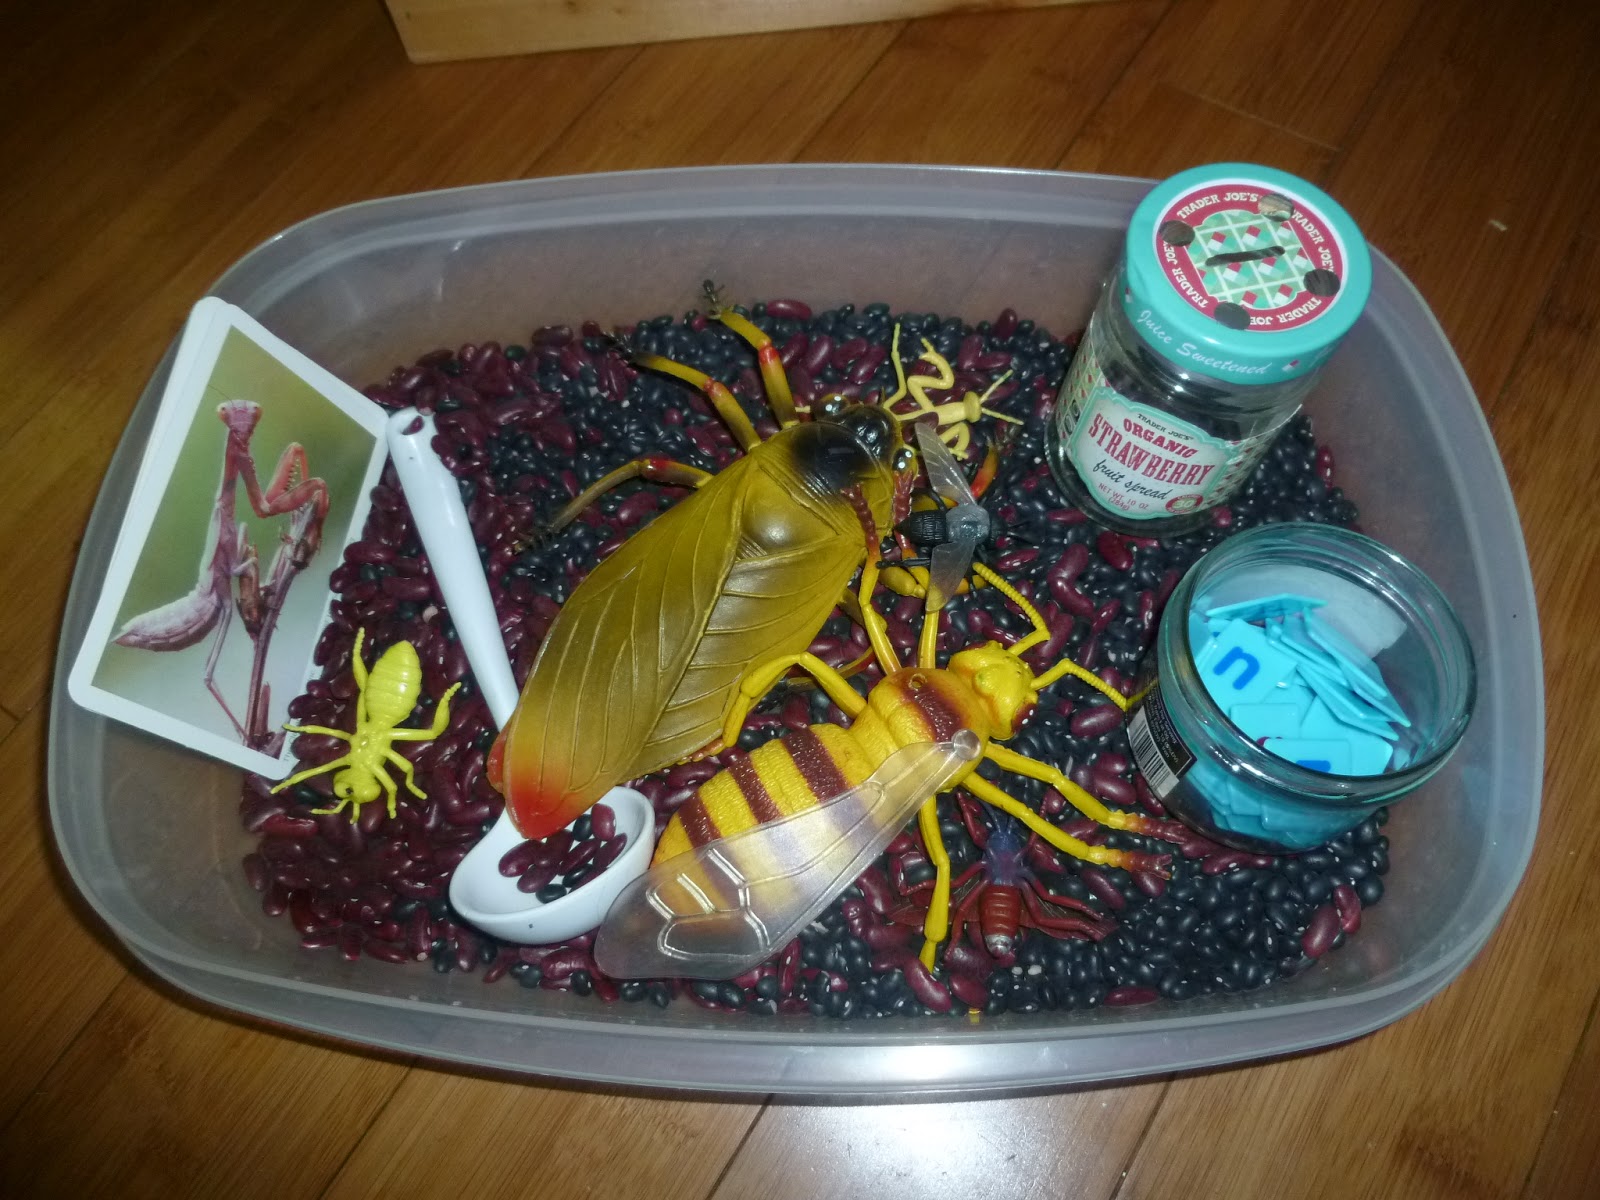
This is an example of one we set up. It is a bug sensory bin. This sensory bin is great
because it is raced from the floor without being too hight the child has to stand...so they can get on their knees if they are little or sitting if they are bigger.
You can even use the inside to store sensory bin items!!!!!
What else? You can attach pockets to the side to store more things....or even attach a tray to hold spoons and cups and other utensils you are using.
What else? You tell me! What else you can do with it or add to it?
Saturday, July 20, 2013
A simple hello!
Hello there fellow moms and viewers!!! I've been so busy that I feel like I am totally neglecting my blog!! You know how it goes....one thing after the other and the time passed by without much time to take a breath...haa...So I thought it was time to take a break and say hello!! I hope you are all doing well and busy but not too busy to stop and take a break yourself.
Sometimes is good to remind ourselves that we are not machines and we have to stop what we are doing to take a well deserved brake and relax. Right now my children are taking a bath...don't freak out just yet!!! The computer is right by the door so I can see them very well...phew!
I am happy because I got most of the North America continent box ready!! Yey!!! It still needs a few details but it is well on its way! I will post it when it is ready so you can see what is inside. I will be working on the others as we go...We just finished the continent puzzle...what it reminds me I made a game!!! I may have a full post on it (I hope) but here is what I did. I had foam squares I bought at the dollar tree and I used two and I wrote all the continents in them...The second one only had a few so I wrote something like "choose and name a continent." So first the child rolls one or both dices and let say it says North America and Europe. The child has to pull those continents off the puzzle map. And you keep doing this until all the continents are pulled out. Then you repeat the same until the continents are back in...My son really like to play even my toddler!
Best wishes to all of you!!!
Monica
Monday, May 20, 2013
Montessori at Home Book Review!
I've been homeschooling my children since they were babies. I LOVE the Montessori method. But learning the method and figuring out what to do could be a bit daunting. So many blogs and so many places that give you suggestions on what to do, how to set up the prepared environment and how to make materials...What happens to me is that I see something in a blog I like then I either try to remember or put a book mark on my computer so it I can remember it for me. When it is time to use it I forget the name of the blog or even the whole idea! It wasn't until I came across The Montessori at Home Book that put all my questions, worries and endless quest for the right info to rest.
The Montessori at Home Book will give you ALL the information you need to properly homeschool your children using the Montessori method. It will tell you how to do it, how to make your own materials with everyday things you may already have at home, how to set up the prepared environment as well as information so you can understand the philosophy behind it. It has links to videos, more information and places where to buy the materials.
With the Montessori at Home Book you have all the information needed in one place! I am a visual learner and this ebook has nice colored pictures that shows you what you need to do or the activity they are presenting.
The Montessori at Home Book is an downloadable book so you can have it instantly at home when you buy it. There is no need to wait for the mail man to come a week later. It is right there at your finger tips to start your Montessori program with your children right now.
I have the Montessori albums or manuals as some other people may call it. I always refer to this book because it explains why something is done, how to do it differently, what are materials for and how to make it yourself. This book is the only book you need to get started. It is written for people that have no idea what to do, like me ;-)! or people that already know and want an easy to follow guide. This is a book that it is written in way that anybody can easily understand it and will guide you through the Montessori journey. It is well written and explains all you need to do Montessori at home.
Take a look at the ebook HERE!
Or you can BUY IT NOW!
Thank you for stopping by! I know this book will definitely help you and I hope you LOVE it as much as I do!
Please, leave me a comment with your experience! I'd love to hear it!
Monday, May 13, 2013
The Forbidden Education/ La Educacion Prohibida
It's been a while since I last wrote. You know how it goes ;-) Anyway, I came a cross a post that Montessori Para Todos wrote in their blog. If you live in Spain, and even if you don't, stop by and visit their store and their blog! The post is about La Educacion Prohibida/ The Forbidden Education.
I am not going to do a re make of their post since it is well written and it is worth to read it, I just want to share with you their post and the documentary about the educational system.
This documentary talks about why the educational system is not working, and much more. It is a 2 hours and 25 minute documentary that it is in Spanish with English subtitles. I highly recommend both the post by Montessori Para Todos and the documentary. This is an eye opening documentary that ALL parents should watch before sending the children to school.
If you can't for some reason open the link to La Educacion Prohibida post by Montessori Para Todos
you go directly to the La Educacion Prohibida documentary.
--------------------------------------------------- --- --- ---------------------------------------------------------------------
Ha pasado un tiempo desde la ultima vez que escribi...Ustedes saben como es ;-) Bueno, me encontre con un articulo de Montessori para Todos al cual queria compartir con todos ustedes. Si vivis en Espana , y si no tambien, pasa a visitar su tienda y su blog!! Este articulo se trata de un documental llamado La Educacion Prohibida ( haga click aqui). No voy a rehacer su articulo el cual esta muy bien escrito y vale la pena leerlo, yo solo quiero compartir con ustedes su articulo y el documentario acerca del sistema educativo.
Este documentario habla a cerca del sistema educativo, porque no funciona y mas. Dura 2 horas y 25 minutos y esta en Espanol con subtitulos en Ingles. Le recomiendo a ustedes que lo vean, tanto el documentario como el articulo de Montessori para Todos. Este es un documentario que les abrira sus ojos y TODOS los padres lo deberian ver antes de mandar sus hijos a la escuela.
Si por alguna casualidad no pueden abrir el link del articulo de La Educacion Prohibida de Montessori para Todos puedes ir directamente a ver el documental haciendo click aqui!
Monday, March 18, 2013
Montessori Flower Arranging Playdough Craft
My son just turned 4 and he got a lot of playdough for his birthday so I was looking at different activities related to playdough and I found a post by Deb Chitwood at Living Montessori Now about montessori inspired spring playdough activities. So that inspired me to come up with this activity that I did today with my kids and they loved it!


Materials:
- Hole punch
- Stickers (any)
- Pipe cleaners
- Some star tags I found at the Dollar store
- Pen
- Child sized scissors
- Small bucket or basket to collect flowers
- 4oz plastic cup
-Glue

So first the child decorates the cup.

Here Umi glued the star tag to the cup.

Working hard!


With the hole punch you make 2 holes on each of it sides. and use the
pipe cleaner to make a handle (see below)

Then the child fills the cup with playdough

Then they collect flowers!

They use the scissors to cut the flowers.

Bucket full of flowers.

Done!!!

Little Princess liked the basket like that and didn't
want to add the flowers.

Umi was proud of his work and took like 10 pictures of it!
Once they were done with it we decorated the table with it. Now, when they wake up tomorrow the flowers are going to look a bit different than when they put them in. So we will discus the importance of water, food and sun.
I hope you find this post inspiring as much as I did Deb's!
UPDATE: The flowers didn't wilt as fast as I thought...It seems like the water in the playdough kept them well longer!
Subscribe to:
Posts (Atom)